Study Coordinator Guide
These instructions will guide you in downloading, installing, and configuring the mCerebrum software suite.
Install mCerebrum
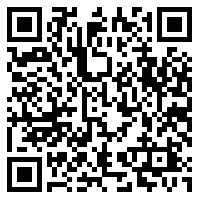
1) Download the latest version of mCerebrum (found at this link or by using the QR code below) and install the APK file.
2) Follow the on-screen instructions on your Android device to complete the installation.
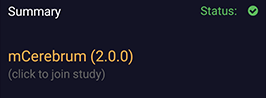
3) When the installation is complete, open mCerebrum. You should see the home screen as shown here:

Join the Study
1) Tap the Summary button at the top of the mCerebrum home screen.
2) Enter your Username and Password, then tap Login.
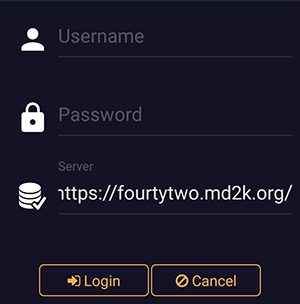
3) Select your configuration file from the list of configurations and install it.

Install/Update Apps
mCerebrum uses a suite of software applications in conjunction with the main mCerebrum interface app. Follow these steps to download the latest versions of the apps in your mCerebrum suite.
1) From the mCerebrum home screen, tap Application Install.

2) Tap the green Install All button found at the top of the screen. Follow the on-screen instructions to complete the installation of all the apps.

3) If prompted, please tap Allow to grant the necessary permissions to each of the mCerebrum apps.

Sensors Setup
1) From the mCerebrum home screen, tap Application Setup.

2) You will need to make sure all the sensors are properly configured. For each app that shows partially configured or not configured, tap the gear icon to access the app settings.

3) For the PhoneSensor app, tap the checkbox to select Default Settings, then tap the back button to return to the mCerebrum app.

4) For the Chest Sensor app, select your device from the list of Available Devices (make sure your AutoSense device is charged and within range). When the sensor is paired, it will appear in the Configured Devices list. Tap the back button to return to the mCerebrum app.

5) For the Wrist Sensor app, select your device(s) from the list of Available Devices (make sure your MotionSense device is charged and within range) then select Left or Right wrist placement to pair the wrist band(s) to the phone. When all wrist sensors are paired, tap the back button to return to the mCerebrum app.

Start Study
Once all mCerebrum applications are installed and configured, tap the Start Study button to begin data collection.

How to Wear the Sensors
All sensors should be charged overnight each day. The expected battery life is approximately 24 hours with a full charge
Wrist Sensors
Wrist sensors should be worn like a watch on each arm with the charging port pointed away from the hand as shown. The buckle is marked L or R to indicate left wrist or right wrist.


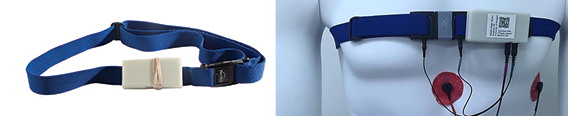
Chest Sensors
Chest sensors should be worn under the armpits and underneath the clothing. Attached the wires as shown. Place the ECG stickers on the body as shown. Attach the ECG connectors to the stickers (you will hear them snap like a button).
How to Clean the Sensors
Wrist sensors and location beacons can be cleaned gently by hand using disinfecting wipes. DO NOT submerge the devices in water. If there is any damage or major spillage, participants should contact a field manager and swap out the device for a new one.
Chest bands (optional) should be cleaned by first detaching the sensor box from the blue band. The sensor may be cleaned gently by hand using disinfecting wipes. DO NOT submerge the sensor in water. The blue belt can be washed using gloved hands in soapy water for several minutes to ensure removal of soilage. Run the belt under running tap water until fully rinsed of all detergent. Dry the belt by firmly pressing it with a towel to remove excess water, followed by a complete air dry.
Sensor Data Quality
Use the Sensor Data Quality icons to determine if your wrist sensors are collecting good data.


Green checkmark means good data quality.

Yellow caution icon means bad data quality.

Red X means no data is being collected.
If you see a yellow caution icon or a red X icon for an extended period of time, you may tap the icon to view a list of simple troubleshooting options:
- In the menu (found in the upper-left corner of the app’s home screen), tap Reset Application, wait 15 seconds and check again.
- Restart the phone, wait one minute and check again.
- Make sure the wrist sensor is charged and LED lights are on.
You may also tap the Graph button to view the wrist sensor data on a plotter in real-time, or tap the Tutorial video link to view a video with detailed troubleshooting instructions.

How to Leave the Study (When a Participant is Finished)
1) First open the mCerebrum app (by tapping the mCerebrum icon on the phone's home screen OR by selecting Settings from the menu found in the upper-left corner of the Study app).

2) In the mCerebrum app, open the menu found in the upper-left corner.

3) Tap the User ID at the top of the menu next to the mCerebrum logo, then tap Leave Study.

4) Tap Yes to confirm and leave the study.

Data Syncing
When a participant is finished with the study, please complete the following steps to sync the data to the cloud, shut down all applications, back up the data on a computer, and prepare the phone for the next participant.
IMPORTANT NOTE: The data files that are recorded by the phone are one hour in length before they are completed and a new file is started. This takes place at the top of every hour. (E.g., midnight, 1:00, 2:00—22:00, 23:00, etc.). This means you should wait until the top of the hour AFTER completing a participant (e.g., regardless if they are done at 14:01, 14:30, or 14:59, they must wait until 15:00 to sync data to the cloud).
Sync Data to the Cloud
1) First, make sure the study is running. (If necessary, tap Start Study in the mCerebrum app.)

2) Open DataKit using the app icon on the phone’s apps screen. If applicable, this may require exiting the mobile device management software (ie, AirWatch).

NOTE: If applicable to your study, you will need to remove the GPS restrictions from the data stream before uploading. To do this, tap the settings gear icon found in the upper-right corner of the Storage/DataKit app, select Upload Data to open the Upload Data menu, then uncheck the Location box under Restricted Data Stream. Tap Save to save your changes, then Close to return to the app.

3) On the DataKit homescreen, make sure the timer is running to show data is being collected. If the timer says INACTIVE, you may need to start the study as described in step 1.

4) Under the Cerebral Cortex header, tap the Toggle button to sync data to the cloud.

5) When you see the “Upload Complete” message, data syncing is now complete.

NOTE: If applicable to your study, be sure to access the settings menu and re-check the Location box under Restricted Data Stream to enable GPS restrictions. Then tap Save to save your changes. This should be done after data upload is complete.

Stop Data Collection
1) Open the mCerebrum Study app.
2) In the Study app, open the menu found in the upper-left corner.
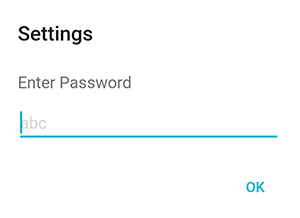
3) Tap Settings.

4) Enter the password provided to exit the study and stop data collection.
5) When you see the mCerebrum app home screen (example shown below), this indicates data collection has stopped.
Back Up Data on a Computer
1) Connect the smartphone to a PC using the charging cable.

2) Create a new folder on your computer. (It may be helpful to use the participant’s user ID as the new folder name.)
3) Using the computer, navigate to the phone’s org.md2k.datakit folder. [Phone > Android > data > org.md2k.datakit]
4) Copy the org.md2k.datakit folder and paste it to the new folder you created.
5) Navigate to the phone’s log folder. [Phone > log]
6) Copy the log folder and paste it to the new folder you created. All study data is now saved to the computer.
Prepare the Phone for the Next Participant
Leave the study:
1) First open the mCerebrum app (by tapping the mCerebrum icon on the home screen or by tapping Settings in the Study app menu found in the upper-left corner).
2) In the mCerebrum app, open the menu found in the upper-left corner.
3) Tap the User ID at the top of the menu next to the mCerebrum logo, then tap Leave Study.
4) Tap Yes to confirm and leave the study.
Delete the Database Storage:
1) From the mCerebrum app home screen, tap Application Setup.

2) Find the Storage app in the list, and tap the Delete icon (red minus sign) to clear all data from Storage.

3) Tap Yes to confirm.

Join the Study with a New Participant:
1) On the mCerebrum home screen, tap mCerebrum (click to join study).

2) On the next screen, enter the appropraite User ID and password for the user and tap Login.
3) When prompted, select the appropriate config file from the list.
4) After logging in, check to make sure all apps are installed and up-to-date (tap Application Install from the mCerebrum home screen, then tap the Check Updates button).